How to Build an n8n Automation to Import your Bank Statement (PDF) into Sure
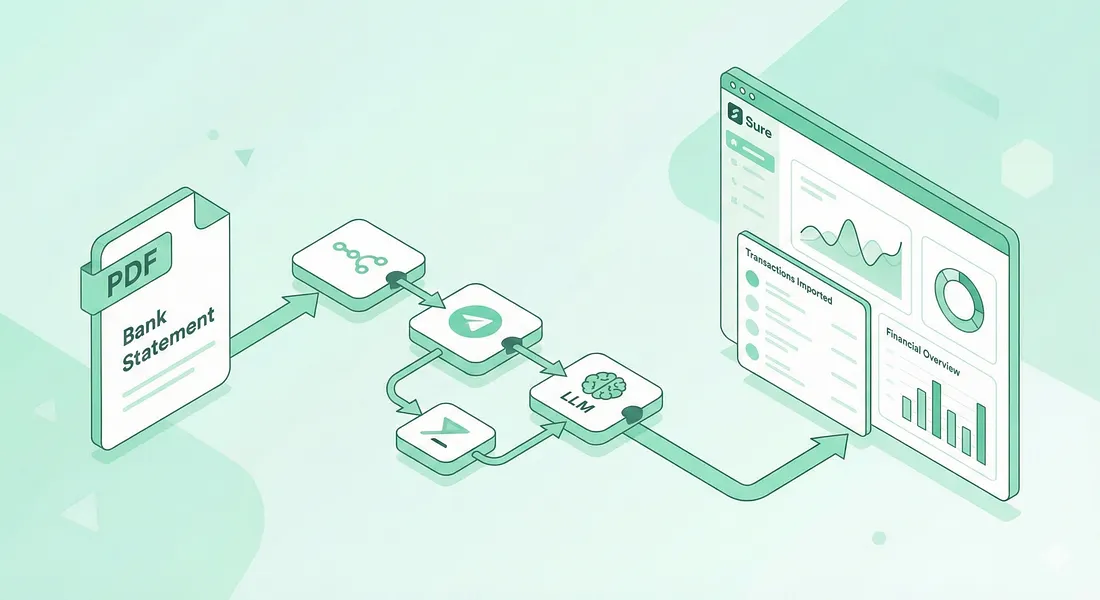
I have been using Sure, which is an open-source finance app, for about two weeks now, and I have fallen in love with it. Currently, users are unable to import transactions through bank PDFs into the Sure app. The app does support import via CSV files. I have tried converting from PDF to CSV and importing, but the data wasn't clean enough. I decided to make a way to automate importing through PDF and make it easy.
While I made a bot that allows not just me but anyone to use it to import their transactions into Sure, I am still very much pro local-first, data-privacy typeshit. This means while you can use my Telegram bot, I understand it is best if people make the flow for themselves, so they can have full access and control of their own data. In this article, I will guide you on how to build a Telegram bot for that.
Prerequisites
Set up Telegram Bot
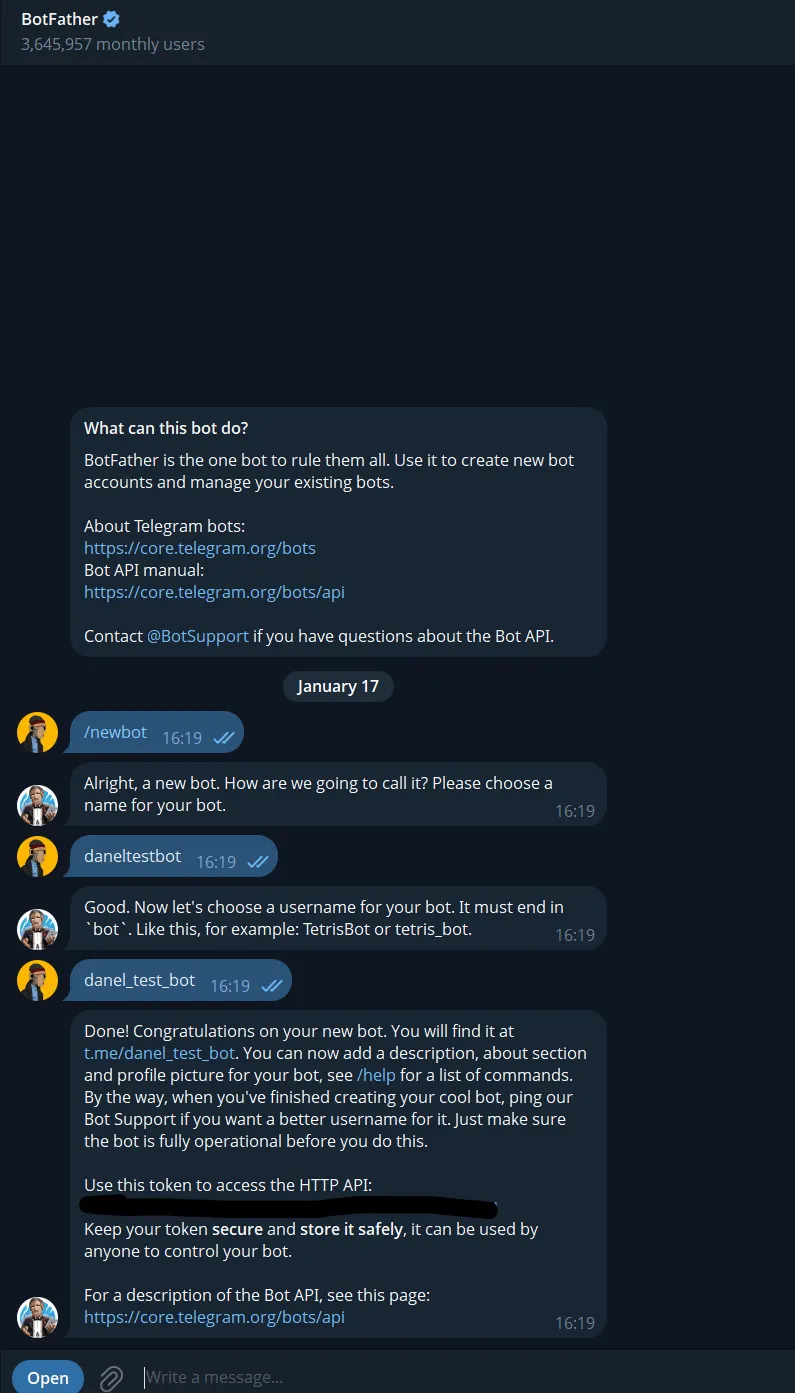
First thing we will be doing is setting up the Telegram bot that would serve as the input layer for our workflow. If you are familiar with n8n, or not, you are free to tweak this part to any flow you would prefer. To set up a bot, text @BotFather on Telegram and set up the bot. After setup, kindly copy the API key. Remember to keep this key safe and secure from anyone else. With it, any hacker can access your bot.
Setting up n8n
Log in to your n8n instance, go to the credentials tab and create a credential. Search for Telegram, then input your copied API key in the field. Then save, if it is correct, it should show green. Feel free to rename the generic Telegram account name, so you can keep track of which particular bot has that API key.

Go back to the workflow tab and create a new workflow. You should get a blank canvas like the one below. Feel free to rename the workflow on the top left of the canvas.

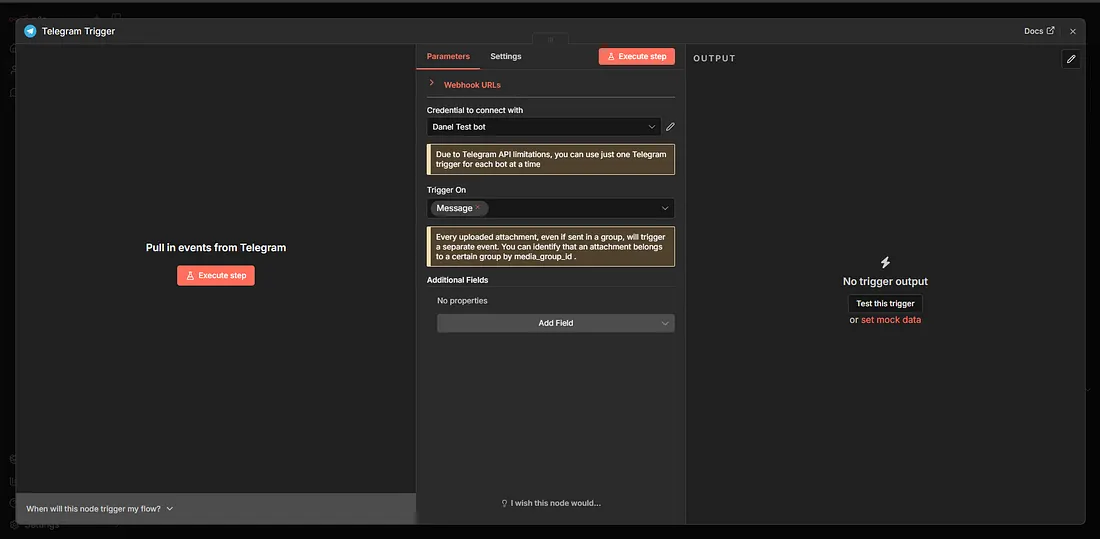
Next thing, search for a Telegram node on the workflow node tab on the right.

You would see a couple of triggers, pick “On Message.” This brings up the configuration screen for the node. Pick the credential to use with it, which is the credential of the created Telegram bot.
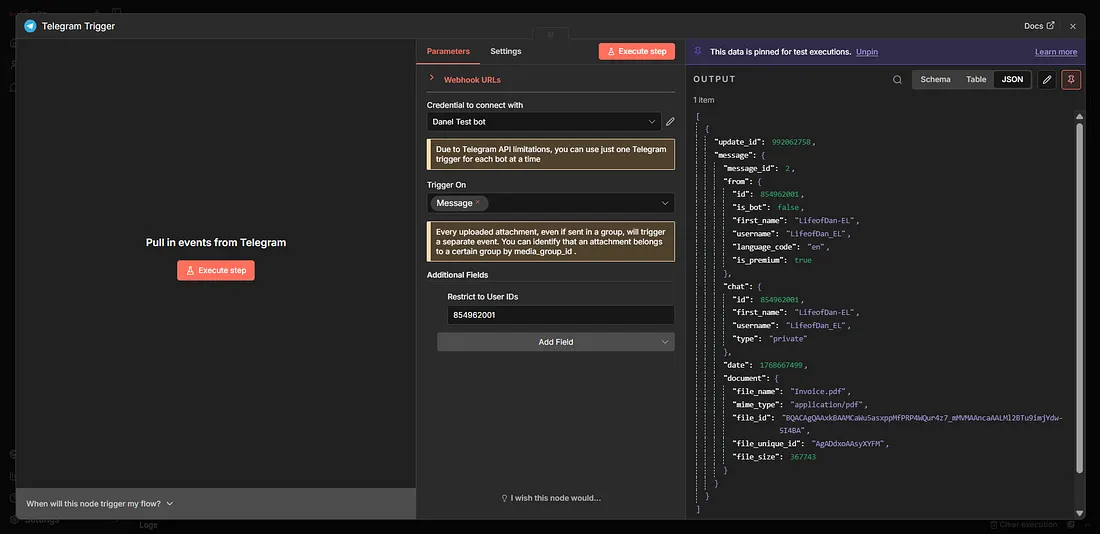
Ideally, you might want to restrict the bot to respond only to you. If so, click on the Add Field and pick restrict to User ID, then put in your User ID. The easiest way to know this is to click on the execute step and then send a PDF to the bot you just created. We can also pin the data, using the pin on the top right, so we don’t have to keep texting the bot to test some features. Remember to run Ctrl + S to save, as you have to save each successful node manually.
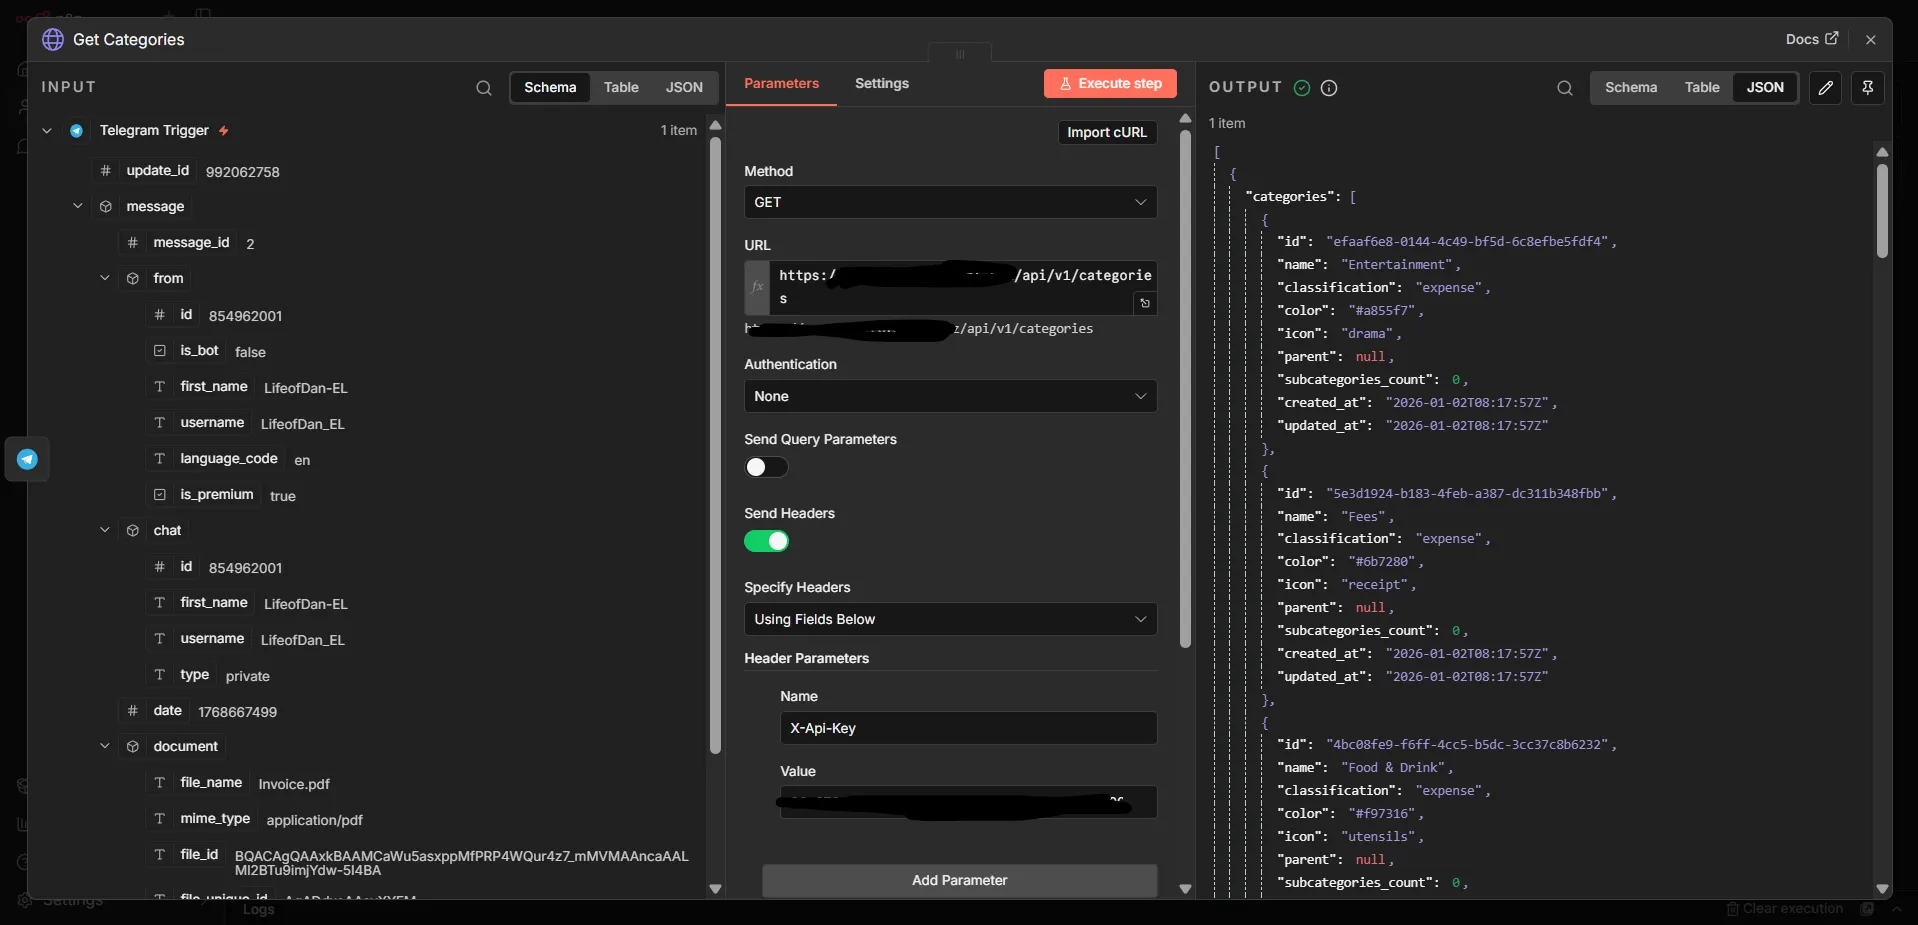
The next step is to click on the + beside the Telegram Trigger node, then add an HTTP Request node. We will use this HTTP node to perform a GET request to obtain the categories on our Sure app. Ideally, you should add categories to your Sure app before this setup. We would be using this data to feed the LLM, to help it categorise the transactions it will process.
Your method should be GET, the URL should be the public URL of your Sure instance, with /api/v1/categories attached to it. Eg https://your_sure_public_url.xyz/api/v1/categories. Then enable Send Headers, and choose Using Fields Below. The name should be “X-Api-Key” and put in your Sure API key (gotten from your settings in the Sure app) in the value field. Then execute the node, and you should see a successful output.
Copy and paste the Get Categories node, and connect the new one to the original. We are going to be doing another HTTP request to get the accounts present in our Sure account. That way, the LLM will know which account the transactions will be recorded to. Ideally, you should have set up your accounts inside Sure already. The only modification is the API route, which is /api/v1/accounts.

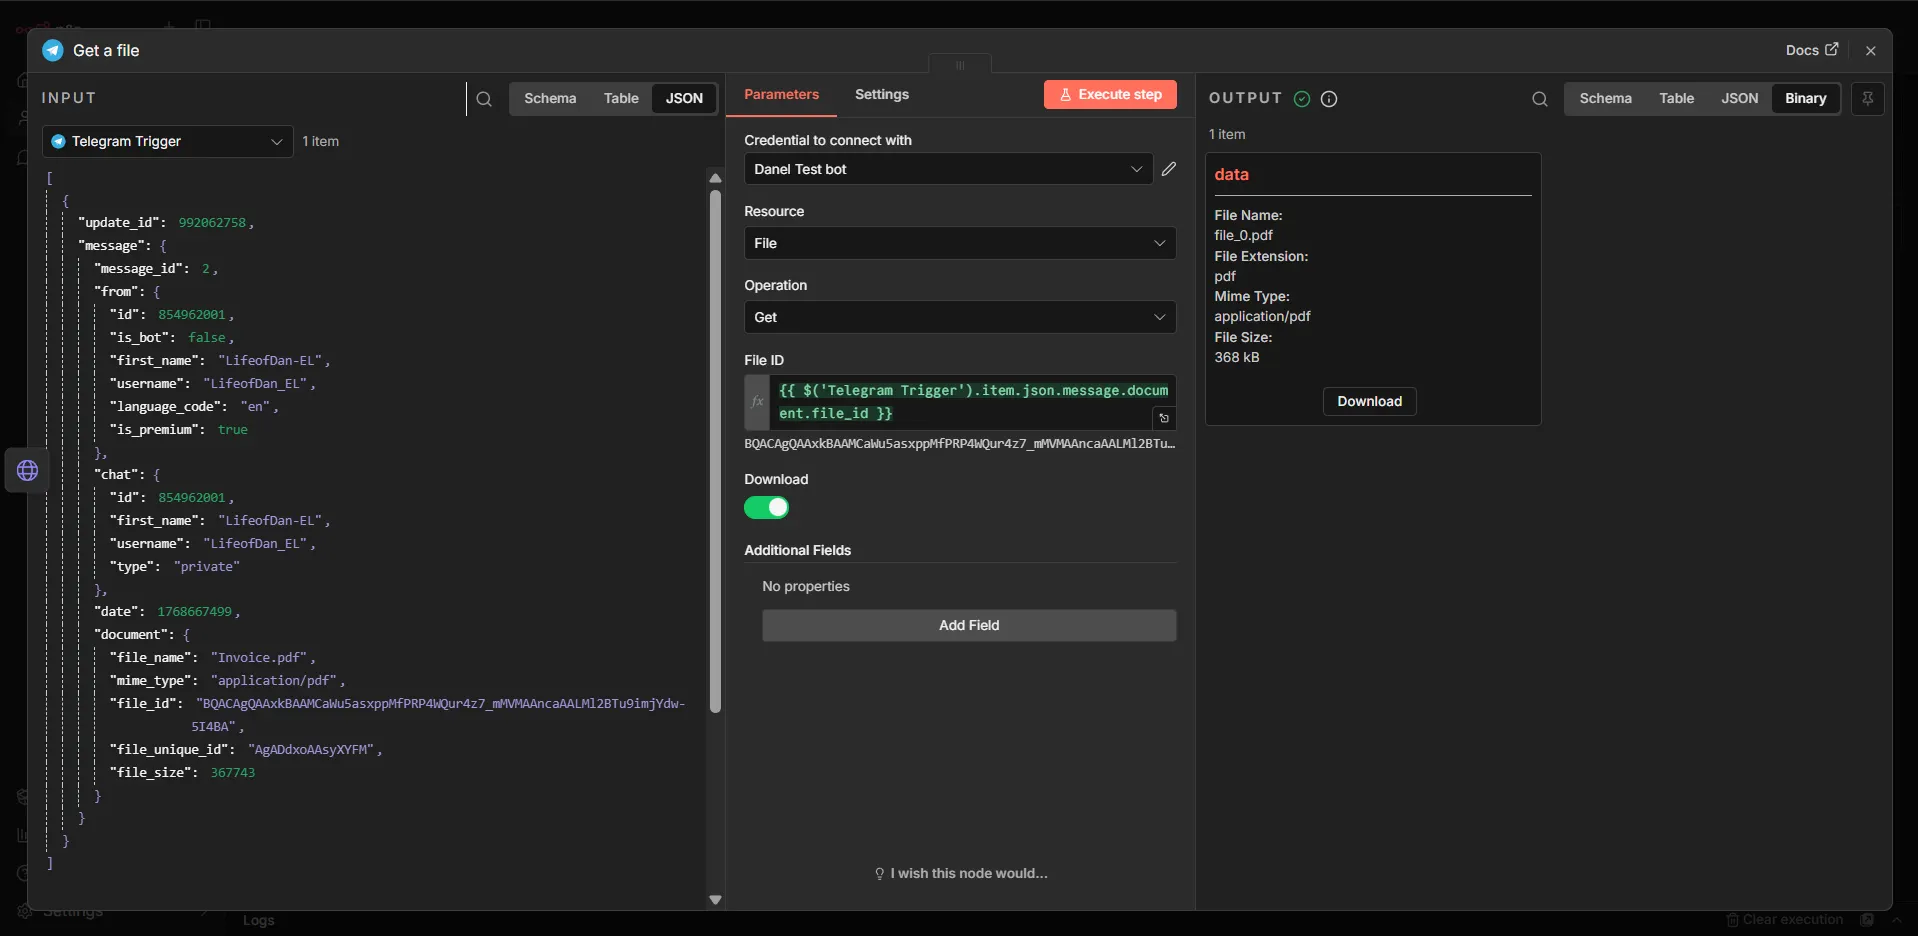
Next thing we add a Telegram Get a File node. This would help bring the PDF we want to process closer to the LLM node. Find the Telegram Trigger input on the left side of the Node setup, then drag the File ID field from it into the File ID on the node itself. Then enable the Download option.
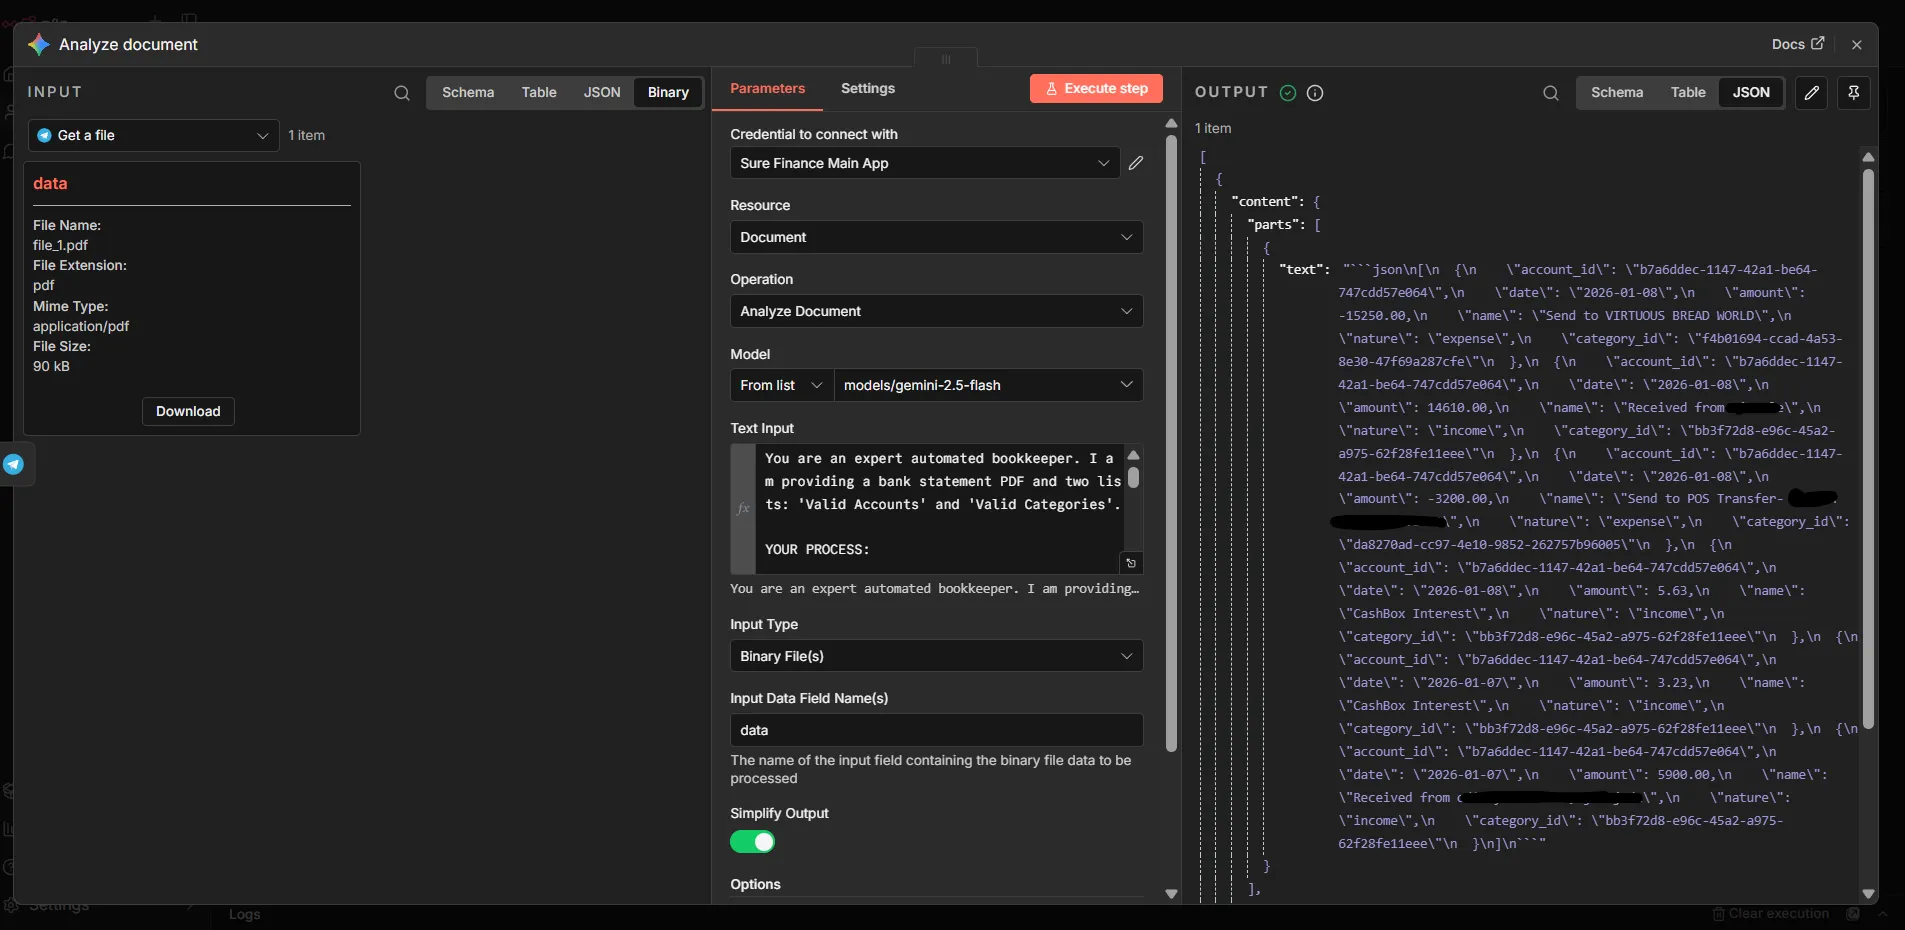
The next step is to add the LLM node that would do the processing. This part is dependent on you, as there are a good number of LLM options to use. There is also support for Olama if your server can run an LLM. Note: When searching for the LLM node, do not pick the option that has Model attached to it. You just need the one that has the LLM name, without “…Chat Model”
I will be using the Google Gemini node. Feel free to set up your credentials for it, if you haven’t already. I am using the Gemini-2.5-flash model. So it is advisable to upload the PDF statement bit by bit and not a statement with a lot of rows of information at once, due to the token limits of the LLM models available. The input type should be binary. The text input is where you add the prompt for the LLM, pick expression. This is my current prompt below, but adjust it to your needs.
You are an expert automated bookkeeper. I am providing a bank statement PDF and two lists: 'Valid Accounts' and 'Valid Categories'.

YOUR PROCESS:

1.  **IDENTIFY THE STATEMENT OWNER (Single Account ID):**
    * Look at the PDF Header/Logo.
    * Compare to the "VALID ACCOUNTS LIST". Fuzzy match if needed.
    * ⛔ **STRICT MATCH RULE:**
        * If the PDF is for "Bank A" but "Bank A" is NOT in the list:
        * **SET `account_id` TO `null` (strictly null).**
        * Do NOT guess. Do NOT pick a random account.
    * **Constraint:** Pick exactly ONE `account_id`. Use it for all rows.

2.  **EXTRACT TRANSACTIONS (With Filtering & Date Correction):**
    * Extract: Date, Description, Amount.
    * ⚠️ **CRITICAL DATE RULE (Force MM/DD/YYYY):**
      * The PDF uses **US FORMAT (Month/Day/Year)**.
      * **Rule:** The FIRST number is the MONTH. The SECOND number is the DAY.
      * Example: Read `01/10/2026` as **January 10th** (2026-01-10).
      * Example: Read `01/11/2026` as **January 11th** (2026-01-11).
      * **Action:** Convert strictly to API format: `YYYY-MM-DD`.
    * ⛔ **CONDITIONAL EXCLUSION:**
      * **IF** Bank is "PalmPay", **IGNORE** any transaction named "CashBox Auto Save".

3.  **ASSIGN CATEGORIES:**
    * Match description to the closest "VALID CATEGORIES LIST" item.
    * **Constraint:** Use ONLY the exact `category_id` from the list. Do not invent IDs.
    * **Logic Guidelines:**
        * **Money In:** Map to "Income".
        * **Clear Expenses:** If the merchant is obvious (e.g., "KFC", "Uber", "Electric Bill"), map to the specific category (Food, Transport, Utilities).
        * ❓ **UNCERTAINTY RULE (Generic Transfers):**
            * If the description is just a person's name (e.g., "Send to John Adam", "Transfer to Mary") AND you are not 95% sure of the purpose:
            * **Action:** Map this to the **"Unsure"** category (if it exists in the list).
            * *Fallback:* If "Unsure" does not exist, map to "Services".

4.  **DETERMINE NATURE:**
    * `income` or `expense`.

=== VALID ACCOUNTS LIST (Name: ID) ===
{{ $node["Get Account"].json.accounts.map(a => a.name + ": " + a.id).join("\n") }}

=== VALID CATEGORIES LIST (Name: ID) ===
{{ $node["Get Categories"].json.categories.map(c => c.name + ": " + c.id).join("\n") }}

=== REQUIRED OUTPUT (Strict JSON Array) ===
[
  {
    "account_id": "THE_ONE_MATCHED_ACCOUNT_ID",
    "date": "YYYY-MM-DD",
    "amount": 100.50,
    "name": "Description from PDF",
    "nature": "income",
    "category_id": "UUID_FROM_CATEGORY_LIST"
  }
]
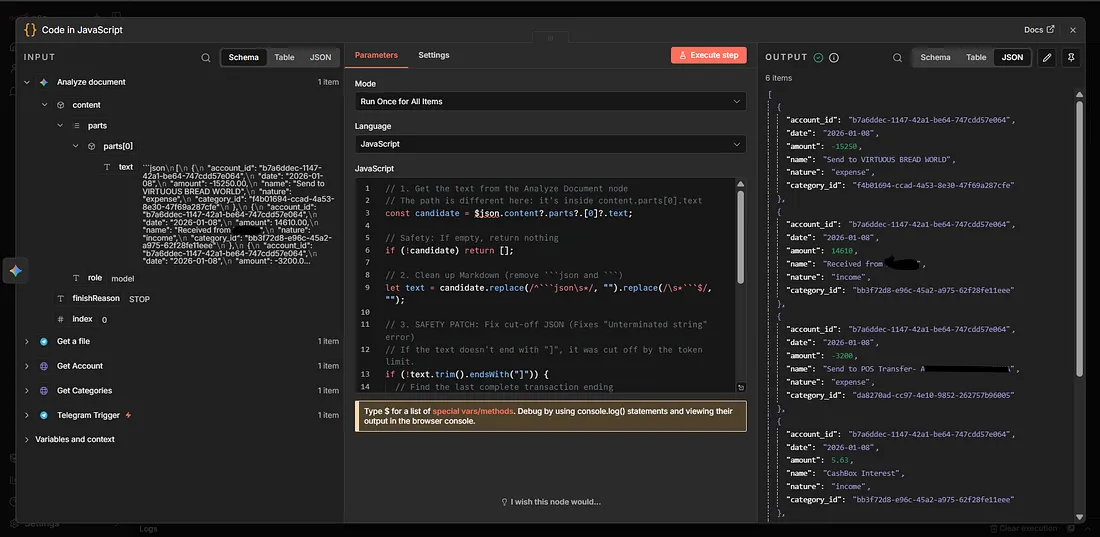
We need to parse the response from the LLM to the proper JSON format we want for Sure. We will add a Code node for JavaScript and put the code below inside. This code also accounts for the output token limit from the LLM.
// 1. Get the text from the Analyze Document node
// The path is different here: it's inside content.parts[0].text
const candidate = $json.content?.parts?.[0]?.text;

// Safety: If empty, return nothing
if (!candidate) return [];

// 2. Clean up Markdown (remove ```json and ```)
let text = candidate.replace(/^```json\s*/, "").replace(/\s*```$/, "");

// 3. SAFETY PATCH: Fix cut-off JSON (Fixes "Unterminated string" error)
// If the text doesn't end with "]", it was cut off by the token limit.
if (!text.trim().endsWith("]")) {
  // Find the last complete transaction ending
  const lastBrace = text.lastIndexOf("}");

  if (lastBrace !== -1) {
    // Keep valid part and force-close the array
    text = text.substring(0, lastBrace + 1) + "]";
  } else {
    // If we can't save it, return empty
    return [];
  }
}

// 4. Parse & Return
try {
  return JSON.parse(text);
} catch (error) {
  return [];
}
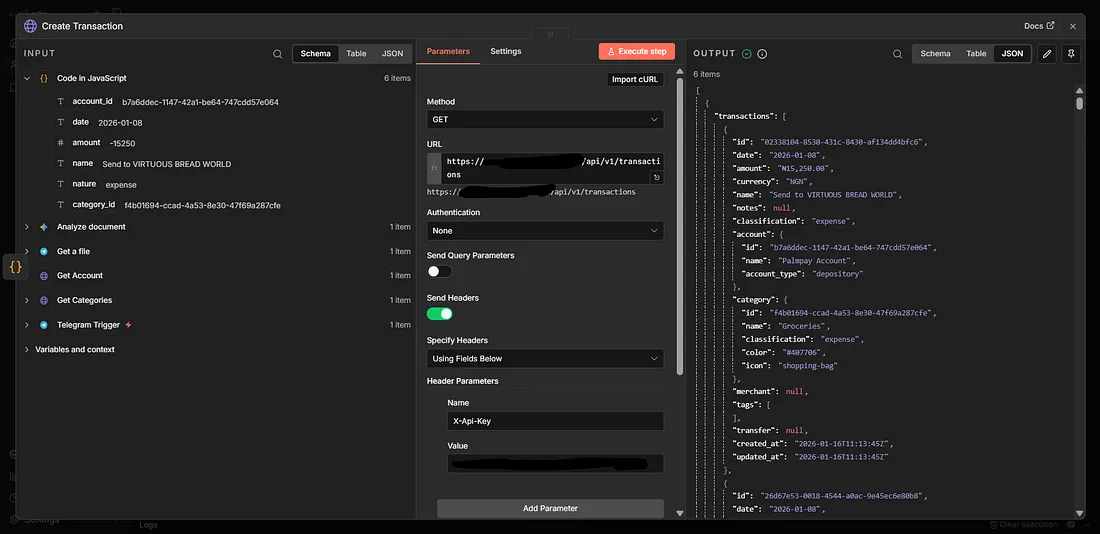
Next, we copy one of the HTTP request nodes, so we can make a POST request to Sure. This will be our Create Transaction node that will handle sending the data to Sure. The API route is /api/v1/transactions.
All these happen in the backend, and as you can see, there is no way for you to know if the transaction worked well or not (we will come back to this), without having to come into n8n. So we will tell the bot to message us that it has completed. But before we do that, we have to summarise the Create transaction node, so it doesn’t send us as many messages as transactions we have just created.
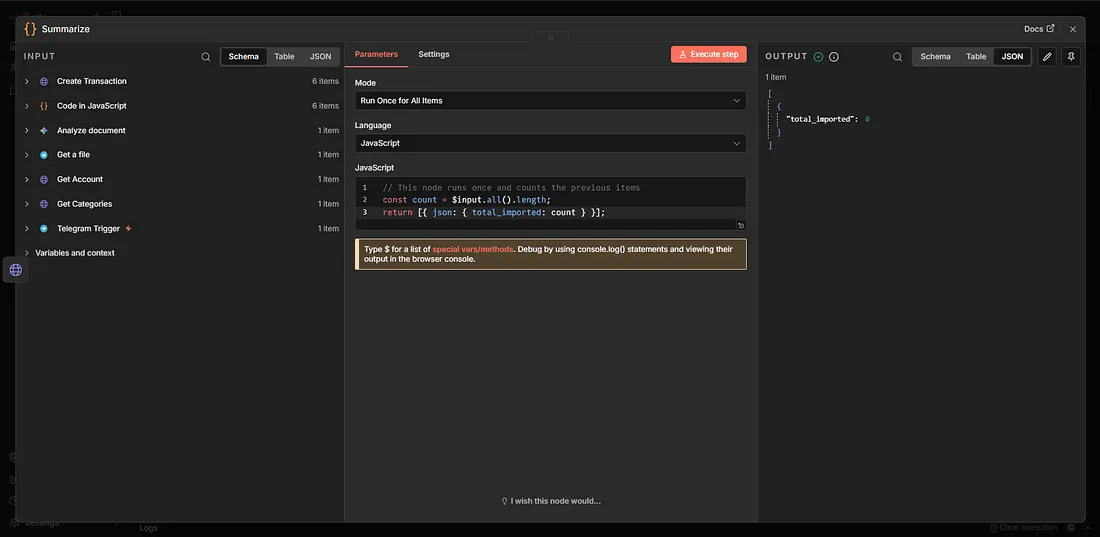
Add a Code Node, which summarises the number of transactions posted. Input the code below.
const count = $input.all().length;
return [{ json: { total_imported: count } }];
Next is to add a Telegram Send Message node, so we receive a message after the workflow is done. In the Chat ID, drag the Chat Id from the Telegram Trigger node or input this “{{ $(“Telegram Trigger”).first().json.message.chat.id }}”.
Then you can add your message. I made mine to show a message dynamically if the result from the LLM was incomplete.
<b>Success!</b>

I have successfully analyzed your statement and created <b>{{ $json.total_imported }}</b> new transactions in Sure.

{{ $(‘Analyze document’).first().json.finishReason === ‘MAX_TOKENS’ ?
“\n\n Warning: This bank statement was very long and hit the AI processing limit. The workflow processed everything it could, but the last few transactions might be missing.\n\n Tip: Try uploading 1 week at a time.”
: “” }}

We are almost done, but what happens if the LLM throws an error? How do we know if the flow wasn’t successful? Go back to the LLM node and click it. Go to the Settings tab under it and click on the “On Error” field and pick Continue (using error output).
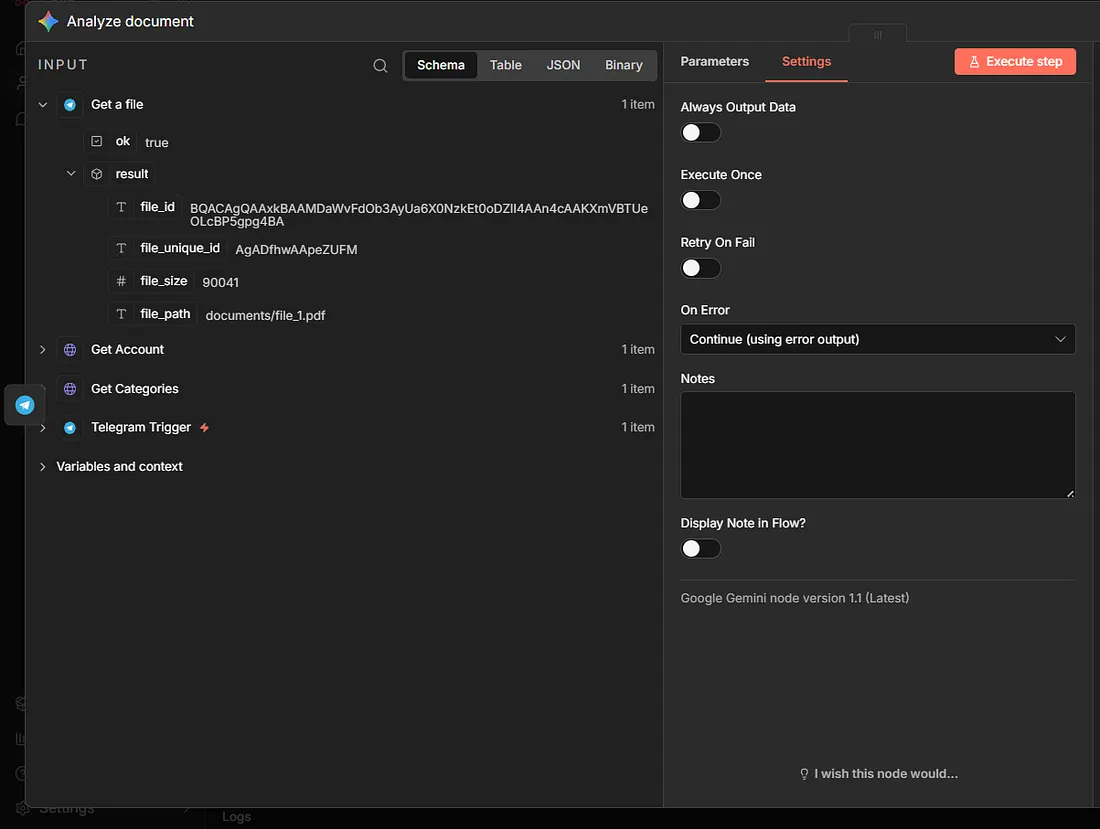
You should notice that the Node now has a Success and Error flow. The Success pipeline is already complete. We just need to attach a Telegram Message node to the Error pipeline. We can copy our existing message node and paste it close to it and attach it.
Then we can add this message:
PDF Processing error

Sorry, but I couldn’t process your PDF, kindly reduce the rows on it (lesser date range), then upload the file again!
Conclusion
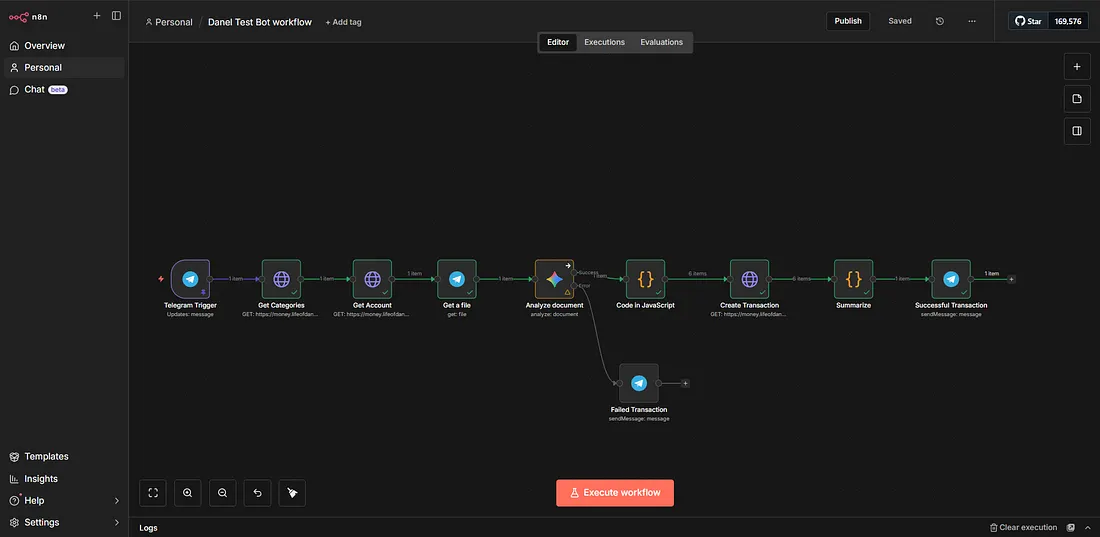
At the end of it all, our workflow should look like this. Remember to save, and then you can publish it. Voila, anytime you upload a bank statement PDF to the bot, it will process it for you. Feel free to modify the workflow as much as you want.
Here is a GitHub gist link to the workflow. You can copy and paste it to your own workflow. Have fun!